I belong to the most wonderfully fun Tea Group, Visions in Red. When I turned 50, my girlfriends thought we should become "Red Hatters", hence the name, Visions in Red. We soon found out that the Red Hat movement was not for us. We lean more towards the Victorian Tea experience. Our belief is that one should take tea with friends, indulging in special treats & friendship. This is a process NOT to be rushed. So, we enjoy our monthly tea events, dressing up, and wearing our special going to tea hats. In fact, we have only ONE rule: You must wear a HAT to tea! We have each taken the name of a favorite grandmother to use as our special tea name. I am Queen Mum Hannah. Queen Mum was dubbed to me, as I am the founder of the tea group. My lovely sister-in-law, Nettie Princess of Etiquette, has graciously organized our February tea event at one of our favorite tea houses. This is a Valentine Tea, to which we are to bring a valentine card to exchange. I am posting a few of the cards I have made. I only need to bring one to tea, but I can't just stop at one when I am in my craft room! Now that I look at these cards, I may have to work on some more....maybe more of a Victorian style card with ribbons, lace, and buttons. But I still like these.
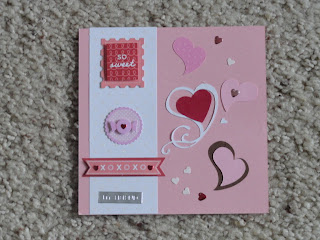
I used a pastel pink cardstock from Stampin Up for my base layer. The white strip is a lovely sparkle paper, which obviously did not photograph well for me. I used my Cricut cartridge, Home Decor, to cut the pink, brown, and white hearts. The dark pink heart is made from Bazzill Basics paper in a pink swiss dot. (also doesn't show in the photo.) I utilized some old stickers I had in my sticker box for the rest, and then my daughter gave me some of her Glam Rocks hearts to adhere.
I am going to
have to write down the names of the papers and their colors for my next project. I am still new to this, so please bear with me. Can you teach an
Old Dog new tricks?
I found this fun tea cup ribbon at Michaels. It is part of their
Celebrate It line. I bought the ribbon and decided to create this card around it. The backing for this card is the Stampin' Up light pink cardstock. I made the cards square to use up my pink Archiver's square envelopes. Chocolate Brown Stampin' Up cardstock layers atop the pink base. I then used the sparkly white cardstock for the third square layer. To soften the look of the card, I used a light pink handmade fiber paper from
Dancing Colors. This type of paper was big about 20 years ago, and I was actually into making my own paper back then....which is very messy to do! Atop this handmade paper, I put my cupcake. Using my Cricut, Home Decor cartridge, I cut out the cupcake in teh chocolate brown, then cut it out in the lovely sparkly white paper that doesn't photograph well. I glued the white cut out over the chocolate brown base to make it look like a muffin paper. To add some pop to the chocolate cupcake top, I outlined it in
Cinnamon Stickles. I taped down my teacup ribbon, and then glued the brown and white layered cardstock squares to the pink square. I then attached my Home Decor cartridge hearts. The chocolate brown FRIEND was cut from my Cricut Sentimentals cartridge. Needing more glam, I attached three adhesive backed heart rhinestones from the Recollections line. I like sparkle!
To end my Valentine cardmaking day, I found an old set of red & black stickers in my old sticker bin. Waste not, want not. I decided to create a red & black card. Using Stampin' Up red and black cardstock. I made a standard 4-3/4 X 6-3/4 card for a 5X7 envelope. The ladybug sticker was already layered onto the black & white tag. I just added a bit of white ribbon. The red hearts were cut from my Emagination punch. The little silver stickers : top one says
Girlfriend, and the second one says
You Are Special. I added the Recollections adhesive backed heart rhinestones for dazzle, and added the key and heart sticker, which is from my old sticker collection box. I believe these old stickers were a Mark Richards collection.
The red cardstock base is attached to a pre-made card. I added an extra red heart with rhinestone to the card in lieu of a postage stamp. This card will be hand delivered.
Sneaking off.....


